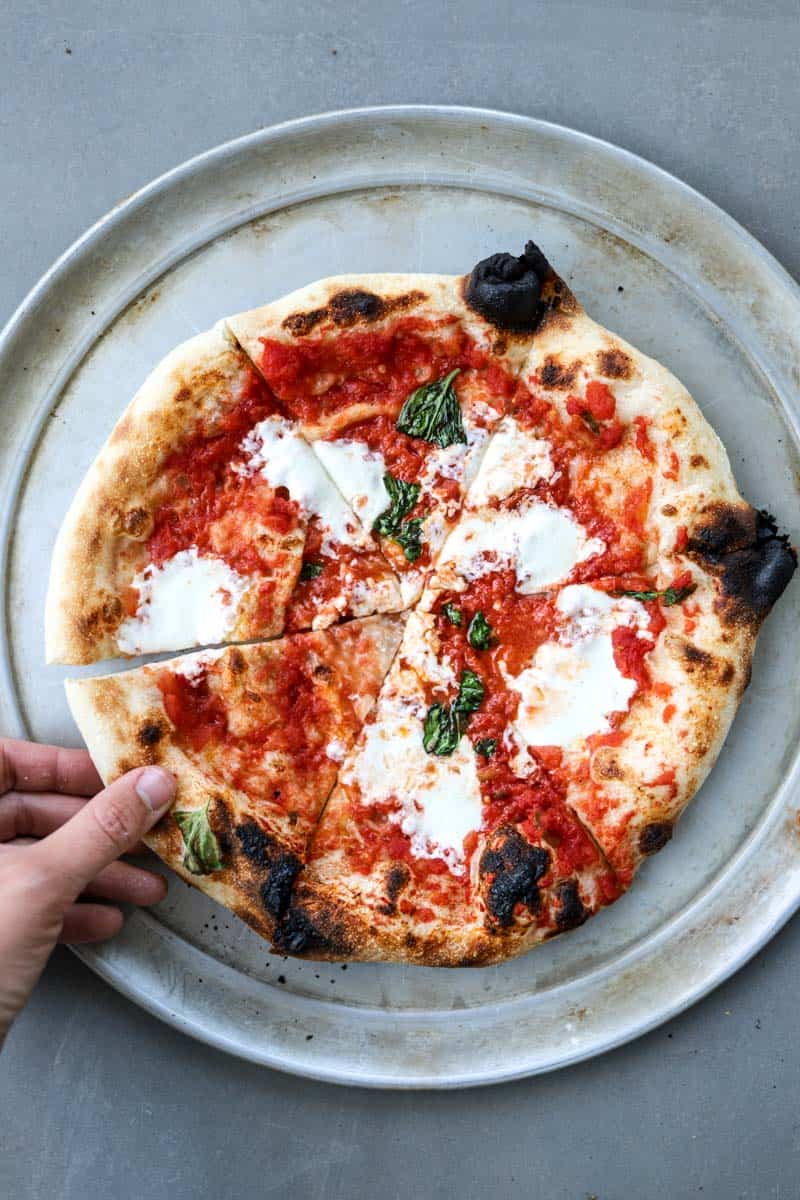
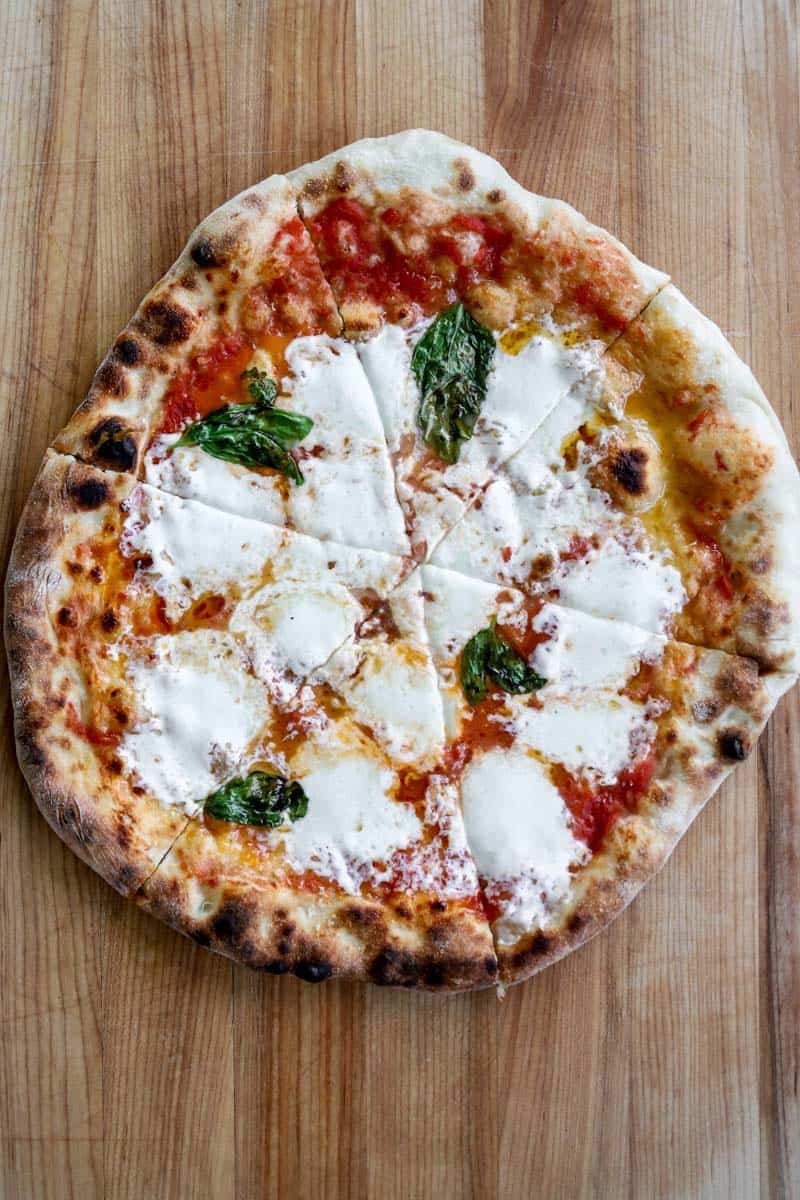
Perfect, homemade margherita pizza.
Welcome to the best-ever guide to making flawless, delicious, swoon-worthy pizza from your very own kitchen. At Female Foodie we take our pizza very seriously. As in, we want to be able to make the best possible pizza at home if we’re going through the hassle of gathering all of the ingredients for prime toppings, mixing/kneading/waiting for our own dough to rise, and then (of course) cooking and serving it to people we love.

After enjoying some of the best pizza in the world in Italy (including Naples, Rome, and Caiozzo), New York City, and other noteworthy pizza cities statewide like Los Angeles, San Francisco, and even Portland, there are a few key things that we wanted in our quest for the best homemade margherita pizza recipe.

Perfect Margherita Pizza Components
- First and foremost, the crust is the foundation of the pizza and must taste delicious on its own. Long gone are the days where we’ll make any old crust and slather it with tomato sauce and cheese. If you’re going to all of the trouble to make pizza at home, you’ll want a high-quality recipe (like this one!) so that your end result tastes like something you could get at a restaurant.
- This recipe is for a Neapolitan style pizza, so (continuing on the topic of crust), you want something thin and delicate– substantial enough to support a few toppings, but fluffy and light enough that you feel like you’re effortlessly ingesting bites of carbohydrate heaven. Also, you absolutely want a bit of char. Don’t call it burnt crust, because it isn’t. A good bit of speckled char (or “leoparding” as the pizza experts will call it) will give your final product amazing texture and taste.
- The toppings must be high quality. We’re talking good quality fresh mozzarella and parm (grab this at your local european market or even at Trader Joe’s or Costco), good quality extra virgin olive oil (here’s our current fav), actual San Marzano tomatoes (imported straight from the motherland and carried at most grocery stores), and fresh basil. Don’t you dare even think about using dried basil.
But where to find or develop such a pizza recipe? One that’s equal parts achievable and wonderfully delicious.
This is where Ken Forkish comes in– chef, restauranteur, and an absolute bread and pizza extraordinaire.
Ken has two incredibly successful restaurants in Portland, both of which we highly recommend, Ken’s Artisan Bakery and Ken’s Artisan Pizza. Ken has also spent years researching pizza of all kinds (including the beautiful, unadulterated Neapolitan margherita pizza) both abroad and in his very own kitchen. When we discovered Ken’s book The Elements of Pizza and made his Saturday Pizza Dough and accompanying Margherita Pizza recipe, it was love at first bite. This was the at-home margherita pizza recipe we’d been searching for. We’re so thankful to Ken for not only putting the passion, time, and work into creating such a recipe (and amazing collection of pizza recipes), but for also allowing us to republish his method and recipe here on Female Foodie.
A Few Tips For This Recipe
- Plan ahead and don’t rush the process. You can make this recipe all in one day, but you need to start the dough first thing in the morning (see sample schedule below).
- Make sure you have the right equipment. We love using our Breville pizza oven for this margherita pizza recipe, but a standard oven will do. You for sure want a food scale, a pizza peel, and a pizza stone at minimum.
- Don’t swap the 00 flour for all-purpose flour, bread flour, etc. This recipe calls for the exact type of flour they use in Italy for pizza– known as doppio zero flour or “double zero flour”. Most European markets carry it, and sometimes if we’re lucky we’ll see it at Whole Foodies, but we find it easiest to just order it on Amazon. It’s extremely finely ground flour and will give you that delicate crust that will really make you fall in love with this recipe.
- Make sure that your pizza peel is dry and generously floured before you lay down the dough and assemble each pizza. There is nothing worse than trying to shimmy a pizza onto your pizza stone, only for it to ball up into a sad-looking calzone (if you can call it that) and waste all of the ingredients
- Keep it simple on your first try. Sure, we love getting creative with toppings (fig and pancetta, speck and hot honey, you name it!), but if it’s your first time making homemade pizza, stick with the original recipe and at most add salami to a pie or two. The process of assembling each pizza and baking is a fast one, but the more you practice, the more you’ll get the hang of it.
Margherita Pizza Recipe Schedule
As mentioned earlier, you won’t want to rush the process for this margherita pizza recipe, but with enough planning ahead you can make this pizza all in one day. Just make sure you start earlier than later so that you and your guests aren’t eating at 10 pm! The dough itself takes about 30 minutes to initially mix and knead, then 2 hours for the first rise, and 6 hours for the second. After that, you’ll want to budget in 20-30 minutes give or take for prep and cooking time. If you’re hoping to eat dinner around 6 p.m., start making your dough no later than 9 a.m.
9:00 a.m.: Mix and knead the dough
9:30-11:30 a.m.: Bulk/first fermentation
11:30-11:45 a.m.: Divide/shape/cover dough
11:45-5:45 p.m.: Second fermentation
4:45 p.m.: Preheat oven & pizza stone
5:45 p.m.: Assemble and make pizza
Don’t let the recipe or schedule overwhelm you. After you make it once or twice, you’ll realize just how simple it is and that the end result is worth the time and effort.
Perfect Homemade Margherita Pizza Recipe
Ingredients
Pizza Dough
- 1 1/2 cups water (350 grams)
- 2 3/4 teaspoons fine sea salt (15 grams)
- 1/3 of 1/4th teaspoon instant dried yeast (0.3 grams)
- scant 4 cups oo white flour (500 grams)*
Pizza Toppings
- 1 28-ounce can of whole, peeled San Marzano tomatoes
- 1 1/2 teaspoons fine sea salt (8 grams)
- extra virgin olive oil
- 1 cup grated Pecorino Romano or Parmigiano-Reggiano cheese
- 16 ounces fresh whole-milk mozzarella cheese (fior di latte) or brine-packed mozzarella di bufala, sliced into short strips about 1⁄2 inch thick
- 15-20 fresh basil leaves
Instructions
Pizza Dough
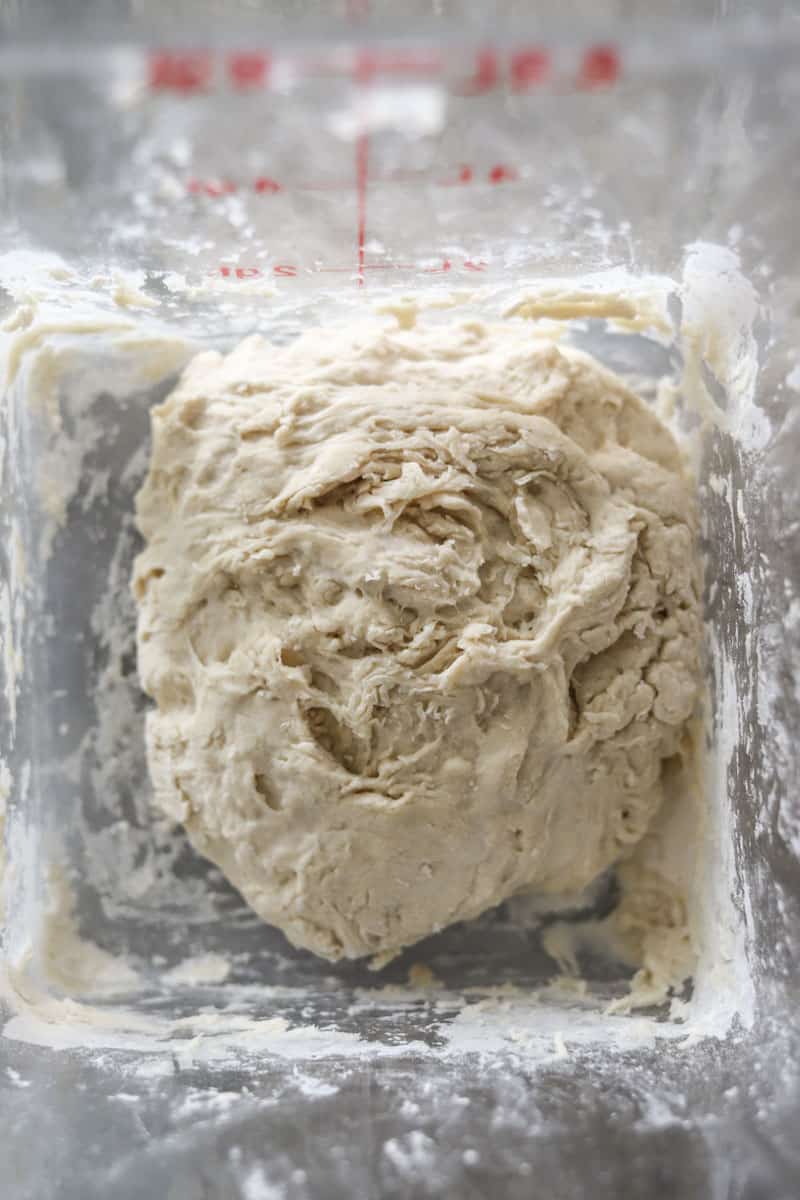
- Measure and combine the ingredients: Using your digital scale, measure 350 grams of 90 to 95 degree F water into a 6-quart dough tub or large mixing bowl. Measure 15 grams of fine sea salt, add it to the water, and stir or swish it around in the tub until it is dissolved. Measure 0.3 gram (about 1/3 of 1/4 teaspoon) of instant dried yeast. Add the yeast to the water, let it rest there for a minute to hydrate, then swish it around until it’s dissolved. Add 500 grams of to 00 flour to the water-salt-yeast mixture.
- Mix the dough: Mix by hand, first by stirring your hand around inside the dough tub or bowl to integrate the flour, water, salt, and yeast into a single mass of dough. Then using your thumb and pointer finger, squeeze big chunks of dough, tightening your grip to cut through the dough. Do this repeatedly, working through the entire mass of dough. With your other hand, turn the tub while you’re mixing to give your active hand a good angle of attack. Then fold the dough back into a unified mass. Continue for just 30 seconds to 1 minute. The target dough temperature at the end of the mix is 80 degrees F; use your probe thermometer to check it.
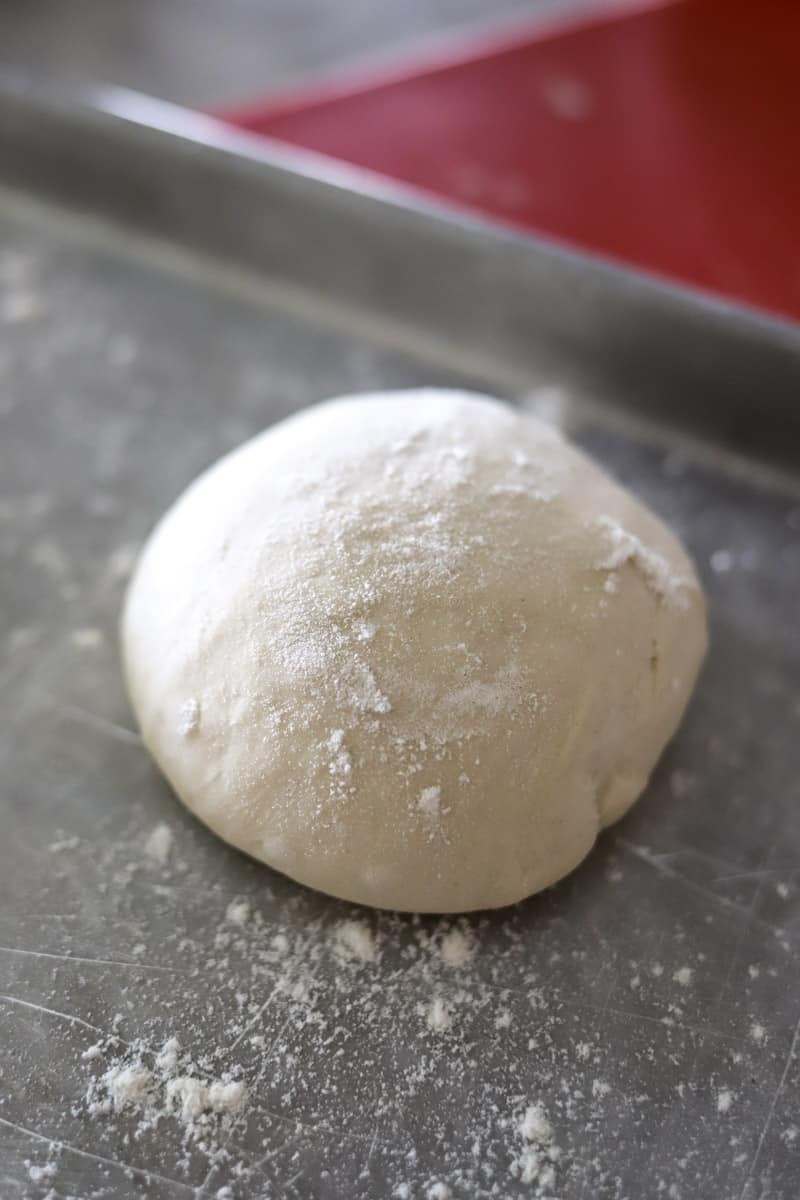
- Knead and rise: Let the dough rest for 20 minutes, then knead it on a work surface with a very light dusting of flour for about 30 seconds to 1 minute. The skin of the dough should be very smooth. Place the dough ball seam side down in the lightly oiled dough tub or large mixing bowl. Cover with a tight-fitting lid. Hold the dough for 2 hours at room temperature (70 to 74 degrees) for the first rise. This timeline is flexible, so if you need to do this after 1 hour or 1-1/2 hours, don’t stress, just make up your dough balls a little early and add the difference in time to the next stage.
- Shape: Moderately flour a work surface about 2 feet wide. With floured hands, gently ease the dough out of the tub. With your hands still floured, pick up the dough and ease it back down onto the work surface in a somewhat even shape. Dust the entire top of the dough with flour, then cut it into 4 equal-sized pieces. Use your scale to get evenly sized dough balls. Shape each piece of dough into a medium-tight round, working gently and being careful not to tear the dough.
- Second fermentation: Place the dough balls on lightly floured dinner plates or a baking sheet, leaving space between them to allow for expansion. Lightly flour the tops and cover airtight with plastic wrap, and let rest at room temperature for 6 hours for the second fermentation. Alternatively, you can rest the dough balls for 4 hours at room temperature, and then refrigerate to hold for up to the next evening.
- Without refrigeration, the dough balls can be used anytime in the 4 hours following the second fermentation. If you refrigerated the dough balls, let them come to room temperature for an hour while you preheat the oven and prepare your toppings.
Tomato Sauce
- Pour the entire contents of the can of tomatoes into the blender. Add the sea salt and pulse on the lowest speed setting very, very briefly, just until the tomatoes are blended.
Make The Pizza
- If you have refrigerated your dough overnight, remove your dough balls from the refrigerator about 60 to 90 minutes before baking pizza. Put your pizza steel or stone on an upper rack in your oven no more than 8 inches below the broiler. Preheat the oven to 550°F for 45 minutes.**
- Set up your pizza assembly station. Give yourself about 2 feet of width on the countertop. Moderately flour the work surface. Position your pizza peel next to the floured area and dust it lightly with flour. Have the sauce, oil, cheeses, and basil at hand, with a ladle or large spoon for the sauce. Switch the oven to broil 10 minutes before loading the pizza.
- To shape the pizza, put the dough ball on the floured work surface and flip to coat both sides. Leaving about a ½ inch of the outer rim un-deflated, punch down the middle with your fingertips, pushing the air toward the rim of the disk, then flip the dough over and repeat. Using floured hands, grab the rim at about the 10 o’clock and 2 o’clock positions and lift so the crust hangs down vertically; preserve the outer rim by placing your thumbs about a 1⁄2-inch from the edge. Let gravity pull the rest of the dough down to stretch it. Run the rim between your hands, working all the way around the circumference of the dough a couple of times.
- At this point, you can work as slowly as you want. If the dough gets sticky, set it down and give both the top and the bottom another dusting of flour. Next, make two fists and position them just inside the rim, with the crust still hanging vertically. Gently stretch and turn the dough repeatedly, letting the bottom of the dough pull down, expanding the surface. Keep a close eye on the thickness of the dough. There is no benefit to overstretching it-- when it's done, it's done and then you lay it onto the flour-dusted peel. You want the dough thin, but not so thin that it tears or can't support the weight of the toppings. If you end up with a small tear, don't panic-- it's okay to patch it by folding a small bit of dough over the hold.
- Transfer the disk of pizza dough to a floured peel and run your hands around the perimeter to relax it and work out the kinks.
- Spread the 1/4-1/3 cups of the tomato sauce over the dough to within ½ inch of the edge, smoothing it with the back of the spoon or ladle. Turn off the broiler, then gently slide the pizza onto the pizza stone or steel. Close the oven door and change the setting to bake at 550°F. Let the pizza bake for about 4 minutes, until the rim is just starting to turn golden. Use a pair of tongs or the pizza peel to remove the pizza onto a plate or cutting board. Drizzle a spoonful or so of olive oil on top of the pizza, then sprinkle 1/4th of the grated pecorino or parm evenly over the sauce. Layer 1/4th of the mozzarella and 3-5 basil leaves evenly over the pizza. Using your hands or the pizza peel, place the pizza back onto the pizza steel or stone and continue baking for 1 to 2 minutes.
- Change the oven setting from bake to broil and let the pizza bake until the cheese is softly melted and the crust is golden with spots of brown and a few small spots of char, about 2 minutes (check it after 1 minute to be safe). Use tongs or a fork to slide the pizza from the pizza steel or stone onto the plate. Drizzle a small amount of extra-virgin olive oil over the pizza and serve whole or sliced in half. Serve and eat immediately.
Equipment
- Pizza Peel
- Pizza stone or pizza steel
- Food Scale
- Probe thermometer
Notes
Did you make this recipe?
Tag @femalefoodie so we can see what you're cooking!